10 years into the future
I started blogging 10 years ago and while my activity has waned to almost non-existence, this endeavor still bears fruit. If you are like me, you live in the present but are looking ahead. Unfortunately, our attention and consideration of time is fairly short range – tomorrow, next week, next month, before the end of the year. Keeping a blog, like a journal, allows us to look back and study the arc of our life experience and extrapolate our way forward – and for this, I think it is fairly valuable.
At the onset in 2006, I thought bloggers were narcissistic and wondered why the world would care about shares of their daily experiences and perspectives. Reluctantly, I began the journey to experience it for myself and also to explore a new chapter in my career. While blogging has waned, the need it filled is very real and now largely being met by facebook, twitter and instagram. For example, I’ve almost stopped writing about my experiences – places I’ve gone, things I’ve done, as I share those almost in real time on Facebook. Facebook, for it’s part, recognizes many of these use cases and now offers features to show posts you made on a given day from a year ago, and even compiles a yearly roundup of memorable moments – another trip around the sun.
I look back on what I was thinking ten years ago and reflect…
I was imagining the start of a new chapter in my career, focusing on social media and later, community. I struggled with being a generalist with no established job role that people would generally understand and this weighed on my self image. Over the years, as our social media support and community programs grew, and my role as program manager became better defined in my mind and reflected by the growing organization, that problem worked itself out.
Another goal was to build my shop – a place to manifest many of my project ideas. I achieved that a few years later.
I wanted to start a services business as another outlet for my creativity and personal interests, and as a hedge that could grow into a retirement income source, and provide an alternate workplace under my direction if need be. This was initiated just over 2 years ago. In all, within 10 years, I had accomplished the broad goals.
Perhaps it is time to reflect again and ensure I am clear on my next ambitions and making measured progress against them.
Replacing water pump on Porsche 986 Boxster S
One night some weeks ago, my wife called to say that on the way home from work her Porsche Boxster S made a rattling sound, then all the engine lights came on the dash and it was “smoking”.
I told her to immediately pull over and asked where she was. I drove out to pick up the car in my rollback truck and found it still venting steam and coolant out the right side of the car almost an hour after her call. The right rear fender was covered with greasy antifreeze residue and the underside of the chassis continued to drip on me as I loaded the car on the truck and secured it to the deck.

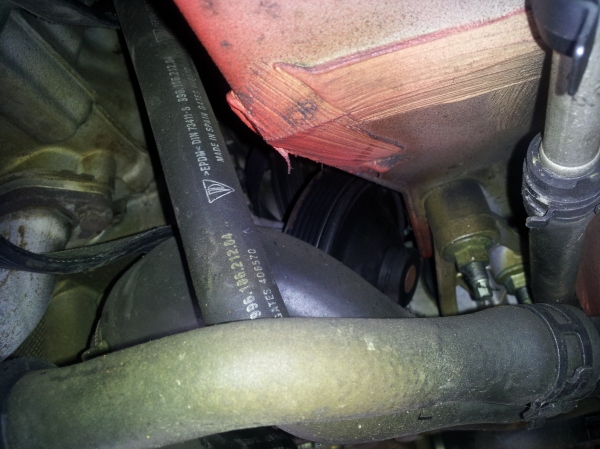
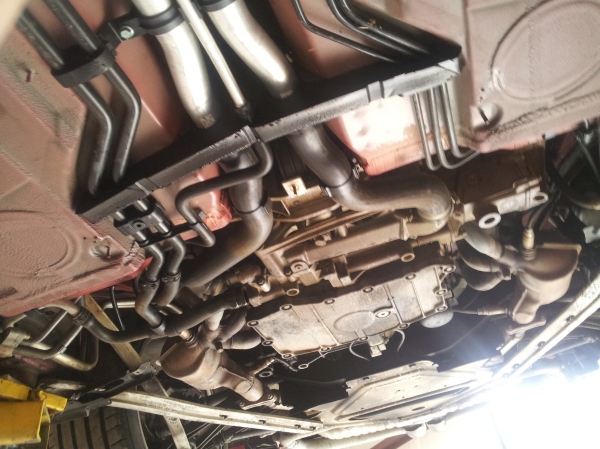
I began work on the project the next day and was glad to see the car still started up and moved about normally as I drove it into the shop. Up on the lift with the multitude of plastic covers removed, I found what I expected, the serpentine belt derailed and the water pump pulley and shaft flopping about. Numerous ball and roller bearings fell out as I removed the covers.
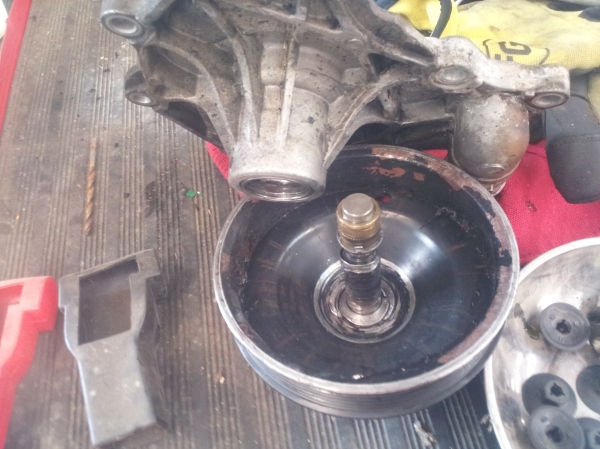
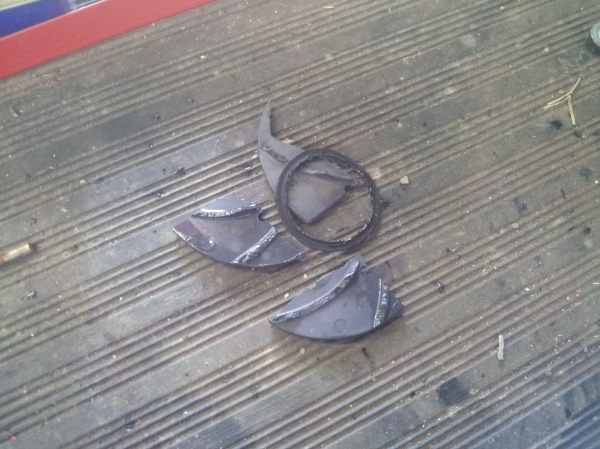
I removed the water pump and found the plastic impeller completely destroyed – only a few pieces remained. I was concerned that perhaps some of these pieces might have circulated, along with pieces of seal and bearing race and might clog up the radiators, or circulate around and damage the new pump I was getting ready to install.
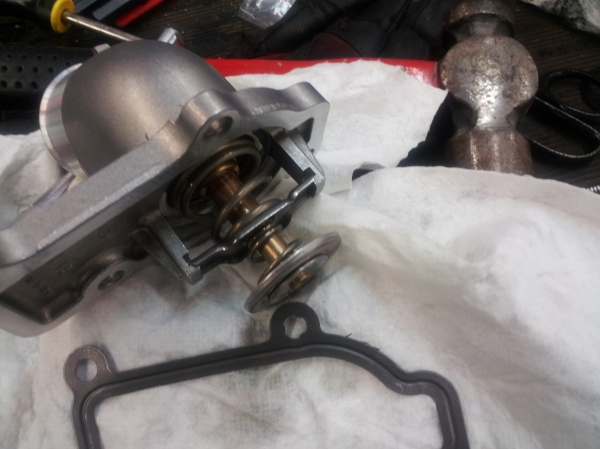
I removed the thermostat and found some more pieces behind it. I recommend this step to others who may find themselves in the same situation.

I replaced the thermostat and water pump, and accomplished this from under car with a bit of effort. Note that the bolts are different lengths, so lay them out on your work surface using the old pump or gasket as a keeper for each bolt so you can be to put them back in the correct locations.
I found some round rubber plugs at the hardware store and bored one out so that a garden hose could be threaded into it and it placed and clamped (with the hose clamp) first into one of the radiator hoses leading to the front of the car, and then the other. With this process I was able to backflush the system in both directions until clean, clear water flowed out the opposite side.
Flushing water through the heater hose seemed to do the best job of pushing clean water through the block and flushing residual coolant and small parts out of the thermostat and water pump cavities.
To install the new serpentine belt, you need to access the front of the engine through the passenger compartment.
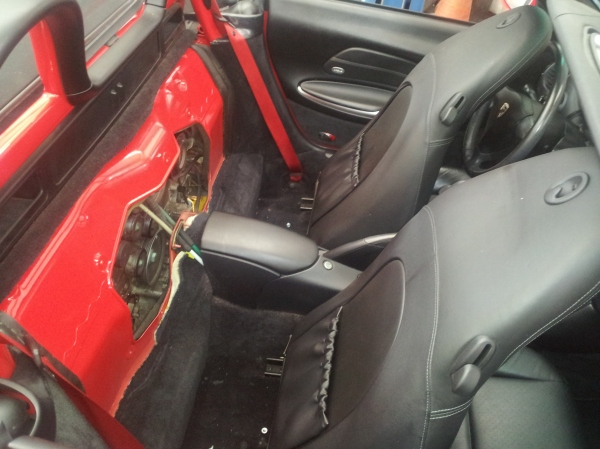

The instructions call for removal of the passenger seat – no need to do this. Simply slide both seats forward and then fold the seat backs forward.
There are four plastic round retainers that snap onto threaded metal pins that retain the carpet and molded foam on the rear bulkhead. You get to these by finding the seam in the carpet just below the sliding plastic compartment doors behind the seats. Reach into the seam and pry it open. You should be able to see the round black plastic retainers.
After the carpet is removed, there is an insulated sheet metal cover retained with a number of 10mm bolts around the perimeter. This is easily removed to access the front of the engine. This is a good opportunity to check the torque on the upper water pump bolts and install the belt. Check the bearings in the other pulleys and rollers.
To this point, I had no trouble. I refilled the system, but noted that I was only able to put in a bit less than 2 gals of the rated 5 gal capacity. I assumed that running the engine with the coolant tank open would circulate the coolant and free any trapped air. Not the case!
After running the engine for 5 mins, the radiator hose was hot at the water pump and perhaps warm half way to the front of the car, but the rest of the lines were stone cold.
The heat was only from convection, not proper circulation. After a few more mins of engine operation, even though the temp gauge displayed 180 degrees, the over temp red light came on and began to blink.
I tried a number of things to clear out the air block and it was time to consult the great and wise Google. This revealed a number of threads in Porsche forums on this topic and solutions ranged from a tedious series of drive and refill cycles, to opening an air vent to allow proper filling.
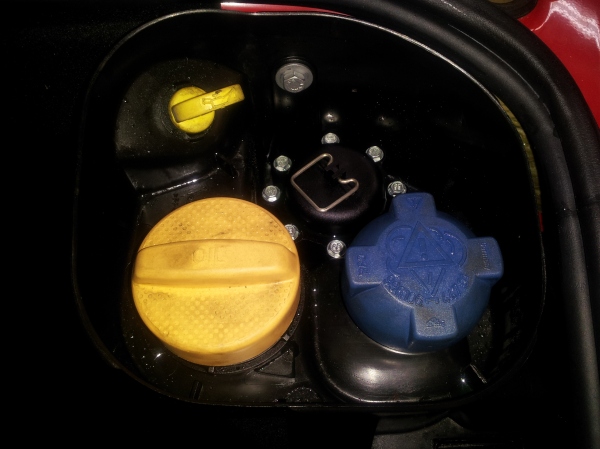
This mysterious air vent was described as being in close proximity to the coolant fill port in the rear compartment. Here is what I found in our car – no vent evident.

Was this only on some model years? Did the location vary? I tried my same search on google for “Porsche boxster coolant vent”, but selected “images” for the results and then found the vent shown. Looking carefully, there is a thin plastic cover plate that can be removed by removing all the fill caps for coolant and oil, and prying along the edges. With this cover removed, the vent is revealed!
Flip up the metal ring as show below.
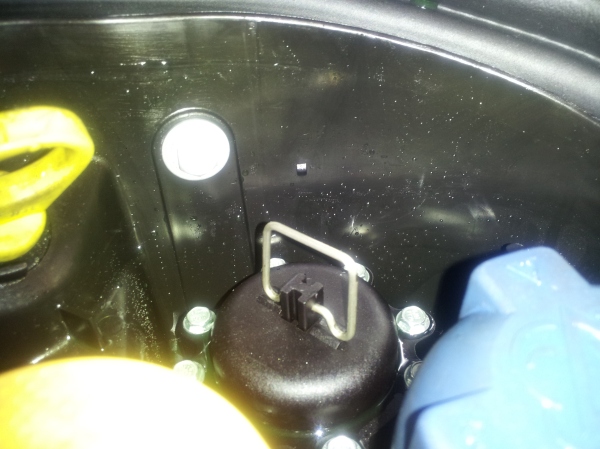
This opens the vent and the coolant level immediately begins to drop in the coolant tank and you can now pour in the full capacity , or nearly so. Following this procedure, coolant properly circulated and both lines became warm on either side of the car (checking the hoses in the front fenders. After driving the car one or two miles and letting it cool, I was able to top off the coolant. One more top off may be required after an extended drive.
Overall, I found the information contained in a particular subscription based mechanic’s reference tool to be somewhat helpful, but incomplete as no clear explanation for the vent procedure was provided. Some steps, like seat removal are clearly not required. The value of the collective experience of many people captured in forum discussions, blog posts, and photos, and revealed through Google or other search engines proved more valuable in the end.
Termites – tiny monsters inside your home
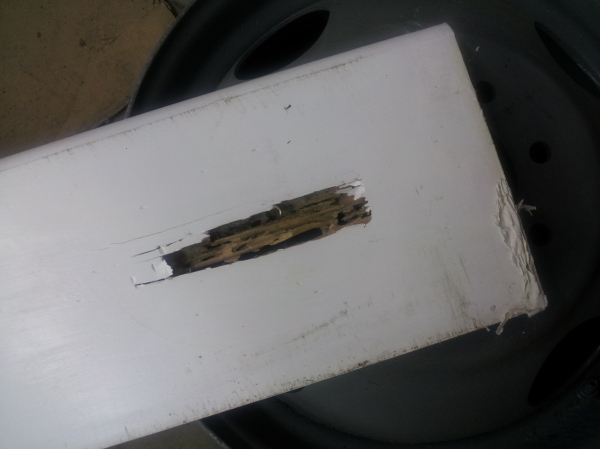
A few weeks ago, I was trying to open a door that leads outside from a downstairs guest bathroom and found the deadbolt was seized. As I struggled with, and eventually destroyed the deadbolt, I realized that I had probably opened this door only once or twice since the house was built nearly ten years ago. In fact, I couldn’t recall the last time the door was opened. As worked to get the door open, I noted a weak spot in the pine stair tread that I had used as a transition piece leading from the door threshold into the room.
As I pressed with my thumb, I found the wood was paper thin in a small area and I realized that this was either evidence of rot, or the work of wood destroying insects. Given the location, I was sure it was the latter.
I dug into the wood with a screwdriver and my concerns were quickly confirmed. I grabbed a crowbar and hammer and removed the piece, only to find the 2 X 4 under it had been chewed away and now had the structural integrity of balsa wood.
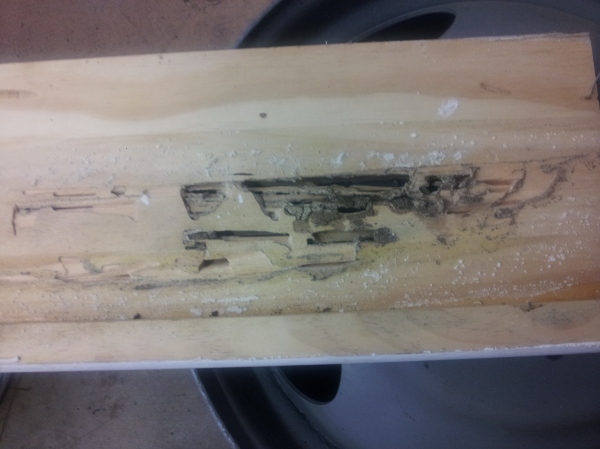
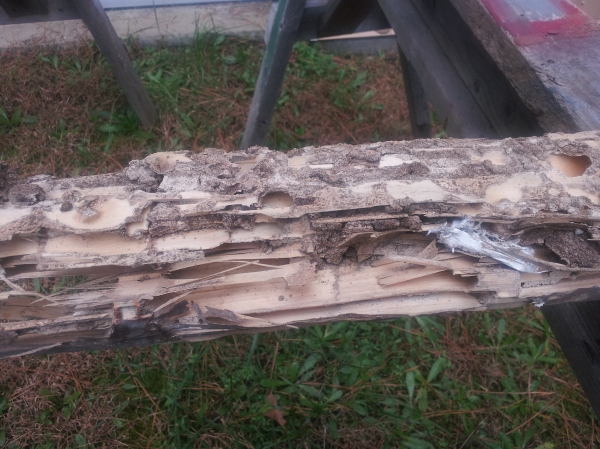
I sawed out the afflicted wood and checked the wall cavities on either side. While the plate had been destroyed, the termites had not made it into the studs, nor had they found the outer pressure treated 2 X 10″ that frames the door edible. They had also been deterred by the glues in the 3/4″ OSB subfloor.
I treated the entire area with a termite pesticide foam, and replaced the affected wood with pressure treated 2 X 4 and pumped several tubes of liquid nails in on either side of it to help fill any voids and ensure a better seal.
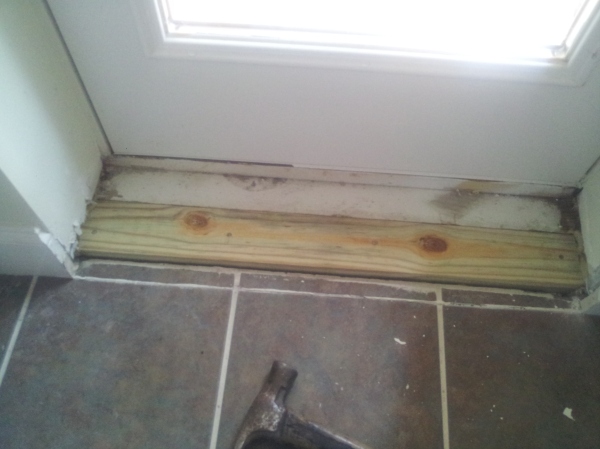
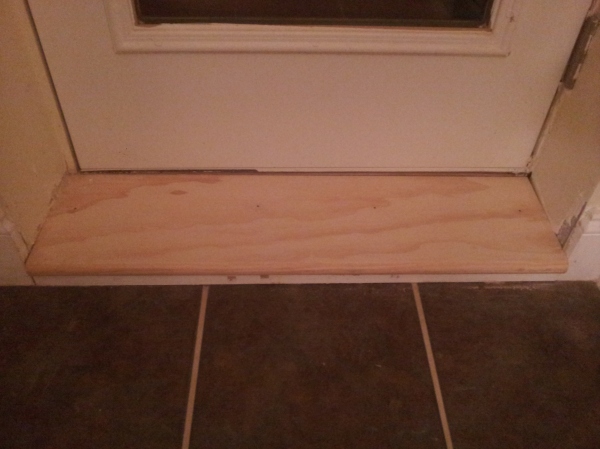
I finished the job with a new pine stair tread (shown below) and then caulked and patched the minor damage to the edge of the sheetrock. A bit of sanding and a couple coats of paint and it will be good as new.
I inspected the inside of the foundation but found no termite trails, so I conclude that they came up from under the concrete slabs of the back porch area. I sprayed this area and refilled the perimeter bait stations with fresh bait / pesticide.
I’ll take this as a lesson – the exterior of the home being 10″ concrete had lulled me into a false belief that termites would not find a way in to the interior wood members of the house. I will be more vigilant in checking the bait stations and spraying the perimeter more regularly.
Exhausting work
With the annual inspection coming due, it was a good time to address a nagging exhaust leak on my venerable ’88 F-Superduty rollback. The leak was between the exhaust headpipes and the catalytic converter. The threads on the bolts of the four bolt flange connecting the assembly had rusted completely away and the nuts were just roundish blobs. I knew that no wrench would be of any use, so I made use of the plasma cutter to cut away the hardware.
I soon discovered that the massive factory catalytic converter was completely gutted – either by a prior owner, or through hard use over several decades. The muffler wasn’t looking so hot, and the abandoned lines to a non-existent air pump were worthless.
I pondered for a couple mins, then ordered up some new parts and reached for the sawzall and set to work. Now was a good time to build a new exhaust system complete with dual cats, mufflers and pipes. The new system will shave some weight, fit more compactly under the truck, reduce hydrocarbon emissions, and improve power and fuel mileage.
After cutting off all the old, rusted junk…
![IMG_20150201_154423[1]](https://markitude.files.wordpress.com/2015/02/img_20150201_1544231.jpg)
I cleaned up the head-pipe flange and drilled out the holes to remove any remaining slag left over from the plasma cutter.
![IMG_20150201_154443[1]](https://markitude.files.wordpress.com/2015/02/img_20150201_1544431.jpg)
I used a piece of paper and a pencil to do a rubbing to transfer the dimension and bolt location to a piece of paper, and then transferred those a piece of 3/8 steel plate I cut to size with the plasma.
![IMG_20150201_170158[1]](https://markitude.files.wordpress.com/2015/02/img_20150201_1701581.jpg?w=600&h=450)
The head-pipes are 2.25 and I decided run 2.5 pipe for the rest of the system so I cut over-sized holes in the plate and then welded in two sections of pipe.
![IMG_20150201_181328[1]](https://markitude.files.wordpress.com/2015/02/img_20150201_1813281.jpg?w=600&h=450)
Generally, I would have preferred to use a 2.5″ hole saw in the drill press to cut nice neat circles, but I decided to just trace around the pipes with soap stone and then cut the holes free hand with the plasma. I used an old wheel to keep the work off the concrete. I have a nice welding table and vice that I should have used to be more professional but it was trapped on the other side of the shop because I took the truck apart before I thought about it.
Next, I tack welded on the converters and bolted the assembly to the flange to check the fit on the truck.
![IMG_20150201_181342[1]](https://markitude.files.wordpress.com/2015/02/img_20150201_1813421.jpg)
![IMG_20150201_181401[1]](https://markitude.files.wordpress.com/2015/02/img_20150201_1814011.jpg)
I’ll continue working my way back adding on additional pipe, dual mufflers and then the tailpipe sections, and finally welding on the hangers.
Rocker panel replacement C30 crew cab dually
Ten years ago, I began to notice some bubbles in the paint on the rocker panels below the doors of my C30 Chevy dually- a sign of rust, that automotive cancer. Being caught up in building my house, and then the shop, I deferred the problem as the truck was perpetually in use dragging equipment on a trailer, hauling diesel fuel, or making endless runs to the lumber yard and home improvement stores.
The paint flaked. Holes appeared, and grew. Soon one of the doors became infected.
Last year, I ordered some steel repair panels and vowed to weld them in when I had the time – perhaps over the winter. As March wound down, I realized I had run out of winter months and excuses for not doing the job. I began work with the plasma cutter, cutting away the rusted areas and sprayed rust converter (stops rust) on the interior and now exposed metal.

The driver’s side rear door was really in bad shape – not only rusted in the corner, but on the bottom interior toward the front. Perhaps a better solution would have been to source a door from a salvage yard from another truck or suburban. But, waste not, want not – I thought I could fix this.

I cut suitable oversized patches from some scrap 14 gauge steel (several times thicker than the body sheet metal) and slipped it between the inner and outer surfaces of the door and Mig welded it from both sides. Next I ground the welds flush and applied filler. Sand. Fill. Sand again. Sand some more. Prime and sand again.

In this view, we can see the forward area on the inside that needed attention. Behind the carpeted trim panel was a ragged, fist size rust hole. More patchwork with the Mig welder – and more filler and sanding, and the door was structurally sound.
Since the carpeted trim panel will cover this, I didn’t worry that it wasn’t completely flat. Smooth yes…flat, not quite.

I wound up repairing rust in both lower corners of the door. Here is the outside surface viewed from the bottom. There is white paint under the red, and factory dark grey primer under that.
So, on to the rocker panels…
Here is a stamped blank. I ordered 4 of these and then found that the fronts are not the same as the rear. Another catalog supplier had a different listing and while their panels were the correct length, they were not as complete, nor of the same quality.

I wound up doing some sectioning on the rear driver side to get the coverage I was after. I welded them in front and rear, and then drilled holes through the bottom, and folded and hammered the flange over as a wrap under the factory pinch weld, and then welded up the holes as plug welds and ground them down and filled them.

The front ones were able to be done with the doors on the truck, but I couldn’t work the rear ones the way I wanted, so with help from a friend we stripped the interior and removed the rear doors taking the hinges with the doors. Here the driver’s side welding is complete, then on to filling and sanding…

We took time to scribe around the hinges before we removed them. Upon reassembly, we were able to snug the bolts, close the door and then use a heavy drift (a 1″ diameter piece of stock) and a hammer to tap the upper and lower hinges up or down, back or front to adjust the door gap all around the perimeter and then tightened the bolts.
The passenger side went much the same, except no door repair needed, the door having been previously replaced.
More filling, sanding and prep work and then will send the truck off for professional sanding, prep and paint. We are freshening up the worn interior and as this has become more of a work truck and less of a 80’s luxury hauler, I’m swapping out the worn carpet for some heavy duty molded black vinyl flooring over the factory insulation. The rear bench seat is in good shape. The aftermarket front seats are a bit worn, and I’ll look for an opportunity to swap them out with burgundy buckets from a mid to late 80’s suburban.
Why have I written so little in the last two years?
I began this blog about six and a half years ago as a vehicle to build experience and a personal understanding in support of a new chapter in my career. In my first post, I wondered aloud at what would motivate a person to share their thoughts, opinions and experiences with the world at large on a frequent basis. My initial outlook was that it must be a very narcissistic activity. Along the way, I found myself drawn in and motivated to write for a number of reasons. Sometimes it was simply to practice writing or an exercise to test out techniques and tactics. Other times, I had experienced something I want to share either because I thought it had value for others, or simply because I thought it was interesting to me and I was projecting a bit about my view of what it is to be me.
The last two years have passed and I’ve managed a scant single post each year in January, my motivations for doing so derived either from the shame of wordpress’ annual report on your blog activity, or some addendum to my New Year’s list of resolutions. So what happened? I spend much of my workday interacting with people online or working on aspects of the technology and business reasons for doing so and at the end of the day or on weekends, I feel a sense to do something tangible. At the same time, I’ve observed so many people becoming increasingly immersed in social networks, chronicling their lives nearly to the minute and this may be causing me to step back. Seemingly, every business, every media outlet advertises and implores the audience to “follow us on Twitter or like us on Facebook”. A colleague uploaded pictures of herself at a running event, and I was amused to see that her runner number also included her Twitter handle. “Social” is almost ubiquitous.
Toyota Autopsy
I’m helping replace the engine in a certain red Toyota pick up truck. This will be the fourth engine in the truck – the first replacement put in several years ago was a basic “reman” engine that just didn’t hold together, the next engine was a high performance custom build, and while the engine builder had a lot of knowledge, it just wound up being plagued with valve train troubles that ultimately led to a catastrophic failure.
As Jim and I swapped out the very broken engine, transferring many of the external parts to the new one, I couldn’t resist tearing into the old engine to see exactly what had failed. When we pulled the valve cover, careful inspection noted one valve was stuck down – a “dropped” valve that typically results in serious piston damage. As I began pulling the valve train and cylinder head, Jim remarked that perhaps I should have been a coroner as I was performing an autopsy of sorts.
![IMG_20121231_171000[1]](https://markitude.files.wordpress.com/2013/01/img_20121231_1710001.jpg?w=600&h=450)
Looking at the cylinder head with number 1 cylinder at the top, we can see extensive damage to the number 2 and number 3.
![IMG_20121231_170953[1]](https://markitude.files.wordpress.com/2013/01/img_20121231_1709531.jpg?w=600&h=450)
Seeing a close up, the intake (the larger valve on the left side) was the one which dropped, and the multiple impacts from the piston broke the stem, and much of the seat and pounded the valve back into the seat sideways. Certainly we can see why the #2 cylinder was toast, but looking at #3 we can see the intake valve is slightly bent and there is a lot of scoring and chipping of the combustion chamber around the valves?
So, what caused all the damage in number 3?
![IMG_20121231_171028[1]](https://markitude.files.wordpress.com/2013/01/img_20121231_1710281.jpg?w=600&h=450)
Taking a look at the block and the pistons. Number 2 has a hole smashed in the top of the piston – obviously damage caused by the collisions with the valve. But, look at the damage in number 3, and these odd pieces that were found inside. These 3 pieces are the valve stem and pieces of the seat from number 2 cylinder.
How did they get into the number 3 piston? My theory is that after the valve in number 2 dropped and was broken by the piston and driven sideways back into the intake port, the intake opening was now permanently open and the compression stroke pushed the broken pieces back up the intake runner. This force, coupled with the vacuum of the intake of the other three cylinders, drew the pieces up into the intake plenum and by luck and adjacency, they were then ingested by the number 3 cylinder on a subsequent intake stroke.
I remain amazed that the valve stem could have passed through the open valve. Perhaps even more amazing was the fact that the engine still ran, limping along on 2 of the 4 cylinders – enough to make it back home.
Brake job on Porsche Boxster S
After the last several months of travel, holidays, work, and family obligations, I found some time to get back to some projects that make use of my wrench collection. New year’s day, Jim and I tackled the brakes and rear axles on the wife’s 2002 Porsche Boxster S. Although now ten years old, the car has less than 50K miles on it and still had the factory brakes. Like many modern cars, the brake pads are now equipped with electronic sensors which indicate when the pads need to be changed – a big improvement over the mechanical “squealers” that were attached to the pads of cars in the past.

While we had the car on the lift, we noted that the rubber boots at both ends of each rear axle had split all the way through and were leaking grease. Torn boots not only allow the axle grease to escape, but dirt and water to enter and attack the CV joints. Left un-repaired, these would eventually start to wear and make clunking or popping noises while cornering, and would eventually fail. Best to replace them now.
We removed the wheels, brake pads, and then the calipers and rotors all the way around the car and hung the calipers from the struts using elastic cord. You could substitute wire, or some old coat hangers – anything that will support them and avoid damaging the brake hoses.

We then removed the brake rotors which were retained with two screws. We marked left and right rotors with soap stone and prepared them for resurfacing.
The rotors on the S model are cross drilled for heat dissipation and are pretty robust pieces and were not particularly stressed during my wife’s commute to work, and occasional road trips. If the car were driven hard, or used in autocross or tracked, the rotors would likely have needed replacement at this point – from wear or potentially due to warping or cracking from excessive heat.

I inspected the surface of each rotor carefully and found no micro cracks. Checking the rotors on the brake lathe, I found about 10 thousands wear on either surface, and was able to true them up removing and additional 8-10 thousandths on each face. Resurfacing, trues the face of the rotor so that it is even and square and will mate properly to the new pads. After the final cut on the lathe, I finished each rotor with a fine cross hatch pattern to eliminate any spiraling from the lathe. This helps ensure quiet brake operation as the new pads are bedded in.
With the brakes apart, it was a good time to tackle the rear axles. Use of an impact wrench speeds removal of the 6 Allen head bolts that retain each axle to the transmission. I tried the first side by hand, and wound up a bit arm weary – if you have air tools, it really helps. Next, we disconnected the sway bar end link, the strut rod at the rear of the spindle, and the lower ball joint. Getting the lower ball joint to release was a chore, but once free the spindle and strut could be swung out and up, allowing the axle to slide inward and be released. (After removing the axle nut and tapping the end of the axle with a brass hammer).
Here, the new axle is installed, the spindle back in place, the strut rod and sway bar reconnected, and the caliper and rotor back in place.


My first android

I’ve just started to use Lenovo’s new K1 tablet – and have had it for about a week or so. Since I work there, my decision to go with this device was partly in consideration for investing in my future and not somebody else’s, but also to better understand the experiences of the customers that I talk to in our community every day.
Over the weekend, there was an update released which addressed a few minor bugs that inherently occur in any hardware / software product. Customers were sharing feedback about a few bumps they encountered during the install and I observed that when I told them that A) I had one of these too, B) Was by no means an “expert” on the product, and C) experienced a few of the same bumps they did and promised to share that with those involved in the release, the tone of the conversation changed.
I was suddenly human, not just an employee. I had just walked in their shoes. This was a moment where I could clearly see the difference in talking to someone vs talking with them.
So far, I really like the product and know I have a lot to learn about Apps and that whole ecosystem. My phone is woefully in need of an update – it can text, and could connect to the web under certain circumstances but hardly resembles anything we would now call “smart”. Once I’m savvy on this tablet, I’ll look into the expense of a phone and think that having one that can act as a portable wifi hotspot will be a key feature on my shopping list.
First time golf spectator
I’m not a golfer and I absolutely can’t stand to watch golf on TV. My dad golfs, my brother golfs, my wife used to golf, and my best friend took up golf several years ago… and still golf eludes my interest. I never expected to find myself spectating at an event, and yet a couple weeks back, my wife and I had an opportunity to attend the Rex Hospital open for a day.

I started the day with nothing more than the expectation of a warm summer day out of the office and anything beyond that would be a plus. Disembarking the shuttle bus, I was immediately impressed by the scale of the event- the branding, featured event partners, and co-ordination of an army of volunteers busy shuttling players and staff about in extended golf carts.
The VIP Viewboxes provided excellent vantage points. I’ll admit, I was quite impressed as the players dropped shots on the greens from hundreds of yards out. Quickly, I could see how important the short game was. Getting to the green – covering those vast distances without losing the ball into the woods, the rough, or any of the water hazards seemed like it should be the hard part, and yet the great seemed to separate themselves from the merely good once on the green.
I reflected on this a bit as I watched and considered how the short game in life – all the details in how well we do the things that we do, make a difference in the outcome – where we find ourselves on the leaderboard of our own profession. As the day wound down, I was surprised to find that I had really enjoyed my time and came away with a new appreciation for the game.
